Have you ever considered how dangerous malicious network traffic analysis can be for your network?
Every unusual data packet could be a clue to a hidden cyber threat.
If we don’t analyze this traffic, hackers could slip through unnoticed.
That’s why understanding how to analyze malicious network traffic is so important—it helps uncover and stop these threats before they cause damage.
In this article, we’ll look at a real-world example, using a PCAP file from letsdefence website to answer nine important questions about suspicious web activity.
Check out: “Introduction to SOC Analysis and Its Role in Network Logs“
Get ready to learn simple and effective ways to find and stop malicious traffic in its tracks!
What is Malicious Network Traffic Analysis on the Web?

Malicious network traffic on the web refers to harmful or dangerous activities that can damage computers, steal information, or disrupt services.
Hackers create this traffic to break into systems, trick people, or cause problems online.
Common Types of Malicious Network Traffic
- Bots: Automated programs that generate malicious network traffic by sending spam, crashing websites, or stealing sensitive data.
- Phishing Links: Fake websites designed to steal passwords or credit card details, often detected during malicious network traffic analysis.
- Exploits: Attacks that exploit vulnerabilities in apps or programs to cause harm, contributing to malicious network traffic patterns.
- Hacker Commands: Instructions sent by attackers to control infected computers, forming a key focus of malicious network traffic analysis.
- DDoS Attacks: Overloading servers with excessive requests to cause crashes or outages, often identified through malicious network traffic analysis.
Why Is Malicious Network Traffic Dangerous?
- Malicious Network Traffic Analysis: Stealing Data
Through malicious network traffic analysis, hackers can identify vulnerabilities to steal personal or business information. - Disrupting Systems: Overloading and Crashing
Malicious traffic can overload systems, causing them to crash and disrupt operations. - Costly Fixes: Expensive Repairs and Recovery
Recovering from the damage caused by malicious network traffic attacks often requires significant financial investment. - Ruined Trust: Loss of Credibility After an Attack
A successful malicious network traffic analysis can lead to attacks that erode public trust in a website or company.
How Can You Spot Malicious Network Traffic?
- Malicious Network Traffic Analysis: Identifying unusual traffic patterns, such as sudden spikes or strange activities on a network.
- Using Security Tools: Firewalls and other software play a critical role in blocking harmful traffic and aiding in malicious network traffic analysis.
- Packet Analysis: Experts examine network data packets to identify and resolve potential issues.
How Can You Stop Malicious Network Traffic?
- Firewalls: Firewalls play a crucial role in malicious network traffic analysis by acting as barriers to block harmful or suspicious traffic.
- Stay Updated: Regularly update applications and software to close security gaps and protect against malicious network traffic.
- Use Trusted Sources: Always rely on trusted sources to avoid exposure to malicious traffic, such as avoiding suspicious websites or unknown links.
- Monitor Traffic: Monitoring network activity is essential for effective malicious network traffic analysis and identifying unusual patterns.
By Understanding: By understanding malicious network traffic, we can better protect ourselves and contribute to a safer internet for everyone!
9 LetsDefence’s Challenges: PCAP Files for Malicious Network Traffic Analysis
1. What is the IP address of the web server?
To find the IP address of the web server in the LetsDefence’s pcap file, I use a tool like Wireshark for the malicious network traffic analysis..
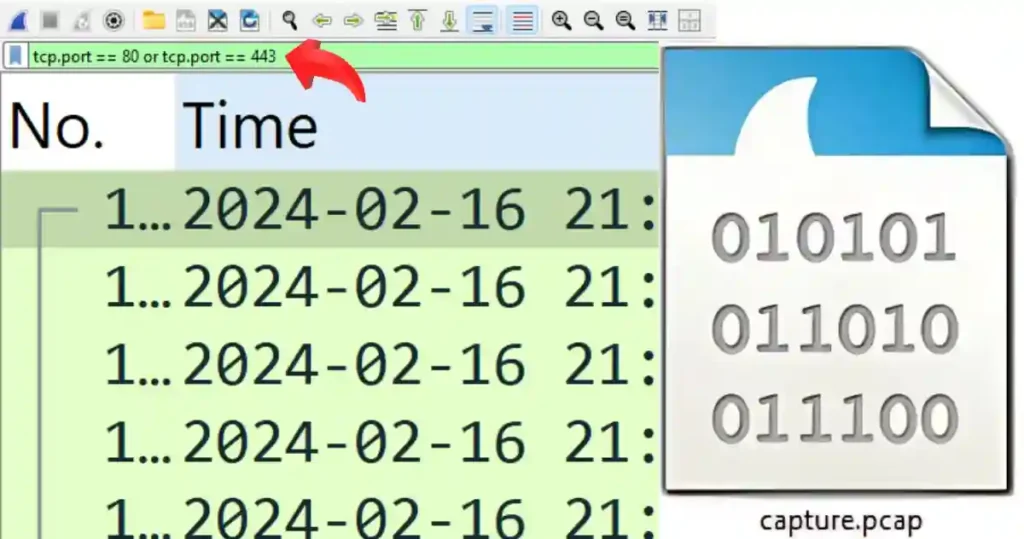
First, I open the pcap file and apply filters to focus on web traffic.
Method I
Since web servers typically use port 80 (HTTP) or port 443 (HTTPS), I use a filter like tcp.port == 80 or tcp.port == 443 to narrow down the results.
Once I’ve filtered the traffic, I start looking at the details of the packets.
For HTTP traffic, I search for responses like “HTTP 200 OK” to find the server’s IP address, which is usually in the destination IP field.
So, I narrow down the result further using: (http.response.code == 200) && (tcp.port == 80 || tcp.port == 443).
If the traffic is HTTPS, I check for a “ServerHello” message, which also reveals the server’s IP by using the filter tls.handshake.type == 2 (this filter captures the “ServerHello” message, identified by handshake type 2 in the TLS protocol).
After I applied the filter, it returned no results, indicating that the communication is happening over HTTP (port 80).
There weren’t any TLS handshakes since TLS is specific to HTTPS (port 443).
To dive deeper, since the ‘ServerHello’ message was not available, I searched for and right-clicked on the ‘200 OK’ response for the HTTP traffic (port 80).
Please use the filter (http.response.code == 200) && (tcp.port == 80) to filter for the HTTP 200 OK response on port 80.
I follow the full conversation between the client and server after right-clicking on the 200 OK’ response packet and selecting “Follow TCP Stream.”
Once you click on ‘Follow TCP Stream’ for the right packet, you can check the content the server is sending back.
For HTTP, you’ll see regular text, like HTML or images.
For HTTPS, the data will be encrypted, unless you have the keys to unlock it.
How to Find the Server IP Address
To find the server’s IP address for the malicious network traffic analysis.
I start by locating the HTTP 200 OK response packet in the packet list as mentioned above, which I filter using (http.response.code == 200) && (tcp.port == 80 || tcp.port == 443).
Multiple packets are displayed, so I click on one of them to open the Packet Details Pane, where I can explore the packet information in more detail.
This pane provides a detailed breakdown of the different parts of the packet, including its layers, where you can find the IP address.
In the Packet Details Pane, I expand the Internet Protocol (IP) section.
Then, I look for the Destination IP Address field, which shows the server’s IP address.
Here, you can see the source IP address (the attacker’s address = 197.32.212.121) and the destination IP address (the server’s address = 10.1.0.4).
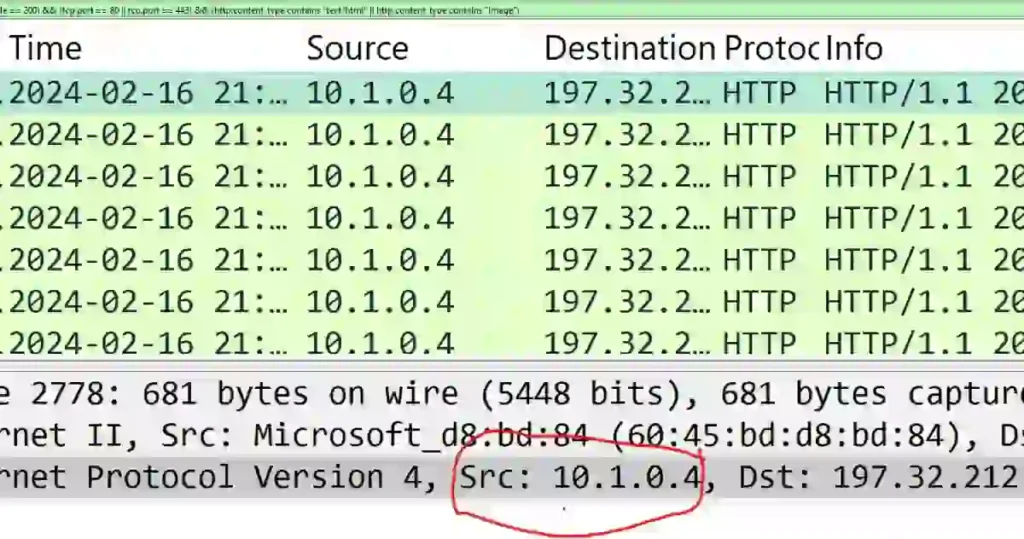
Finally, To double-check, the Source IP Address usually belongs to the attackers’, and the Destination IP Address belongs to the server.
To confirm this, I first look at other related packets to see if the same IP address consistently appears in the server’s responses.
To check if the same IP address appears in the server’s responses, first find a packet with the server’s response (like an HTTP 200 OK) by filtering for HTTP traffic (tcp.port == 80).
Click on the packet to open its details and note the Destination IP field, which shows the server’s IP.
To see if this IP appears in other packets, right-click on the packet and select Follow TCP Stream to view the entire conversation.
You can also use the filter ip.addr == [Server IP] to show all packets with that IP.
This will help you check if the same server’s IP is in the responses throughout the session.
I also check the HTTP Host field for domain names and match them to the corresponding IP address.
To check the HTTP Host field and match it to the IP address in Wireshark, first apply the filter tcp.port == 80 to show HTTP traffic.
Then, look for an HTTP GET request using the filter http.request. Once you find the packet, click on it to open the details.
In the details, expand the Hypertext Transfer Protocol section, and look for the Host field, which will show the domain name (like www.example.com).
To find the IP address, check the Destination IP field in the same packet.
You can also do a DNS lookup to confirm the match. If you want to see the full conversation, right-click the HTTP request and choose Follow TCP Stream.
By combining these methods, I confidently identified the web server’s IP.
2. What is the attacker’s IP address?
To find the attacker’s IP address for the malicious network traffic analysis.
I start by locating the HTTP 200 OK response packet in the packet list as mentioned in 1 above, which I filter using (http.response.code == 200) && (tcp.port == 80 || tcp.port == 443).
To get more details about the packet, I click on one of the packets shown to open the Packet Details Pane.
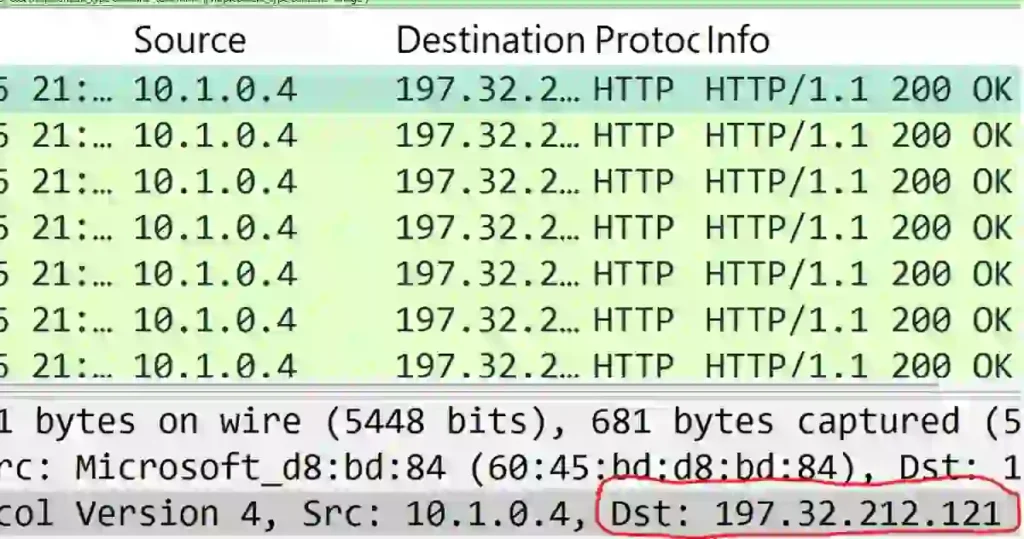
I expand the Internet Protocol (IP) section, just like I did earlier, and look for the attacker’s IP address, which is the destination IP address.
Here, we can see the destination IP address (the attacker’s address = 197.32.212.121).
3. The attacker first tried to sign up on the website. However, he found a vulnerability in that he could read the source code. What is the Name of the Vulnerability?
To identify the vulnerability for the malicious network traffic analysis, I followed these steps:
Filter HTTP and IP Address Traffic:
I applied the http && ip.addr == 197.32.212.121 filter to isolate HTTP requests and responses, the IP address of the attacker in the PCAP file.
Focusing on each of the registered targets (e.g.,. /register/register.php.)
Note: The registered packets can be traced manually by scrolling through the list of packets until the registered targets are found.
Alternatively, you can filter the packets using the following filter:
http && ip.addr == 197.32.212.121 && http.request.uri contains “/register/register.php”
Inspect HTTP POST and IP Address Requests:
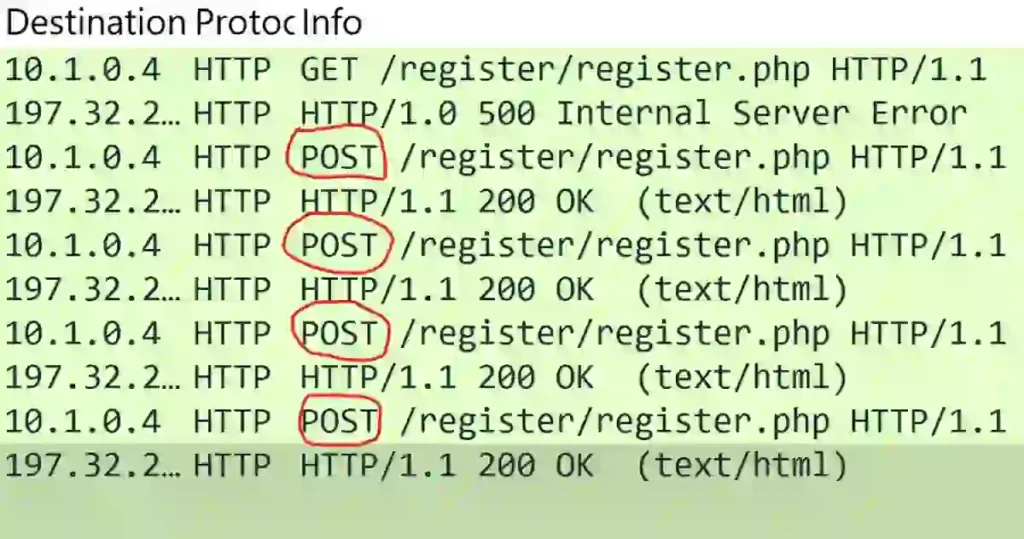
I examined the POST requests by right-clicking on each packet and selecting Follow > HTTP Stream to view the complete request and response for each registered packet.
In this case, the last POST request revealed the XML payload containing the suspicious &xxe; in the <email> field.

Look for Patterns: I checked the payload for unusual elements like XML external entities (&xxe;) that might indicate an XXE attack.
Analyze the Response: The server’s response, “Sorry, is already registered!” suggested that the request was processed, but the server either ignored or mishandled the &xxe; entity.
Assess Vulnerability: Based on the payload structure and response behavior, I concluded that the attacker was likely attempting an XXE attack to exploit impropr XML processing.
Further testing would confirm if the server is vulnerable.
These steps allowed me to determine the potential vulnerability and its impact.
4. There Was A Note In The Source Code: What Is It?
To find the note for the malicious network traffic analysis.
Using the POST /register/register.php request in the third (3rd) challenge above.
Follow the same steps as before, then scroll down to see the encoded note displayed below.

By exploiting the XML External Entity (XXE) vulnerability, I extracted the source code of the targeted file using a decoding tool (https://www.base64decode.org/) to extract the plaintext content.
Note: The file is encoded in Base64, so copy the code starting from “PD9waH” and stop at “==”.
This is the standard format for a Base64 encoded file.

Decoding the Base64-encoded data revealed the embedded note, “yougotme,” intentionally placed in the PHP file.

This demonstrates how the XXE attack was successfully used to expose server-side information.
5. After Exploiting The Previous Vulnerability, The Attacker Got A Hint About A Possible Username. What Is The Username That The Attacker Found?
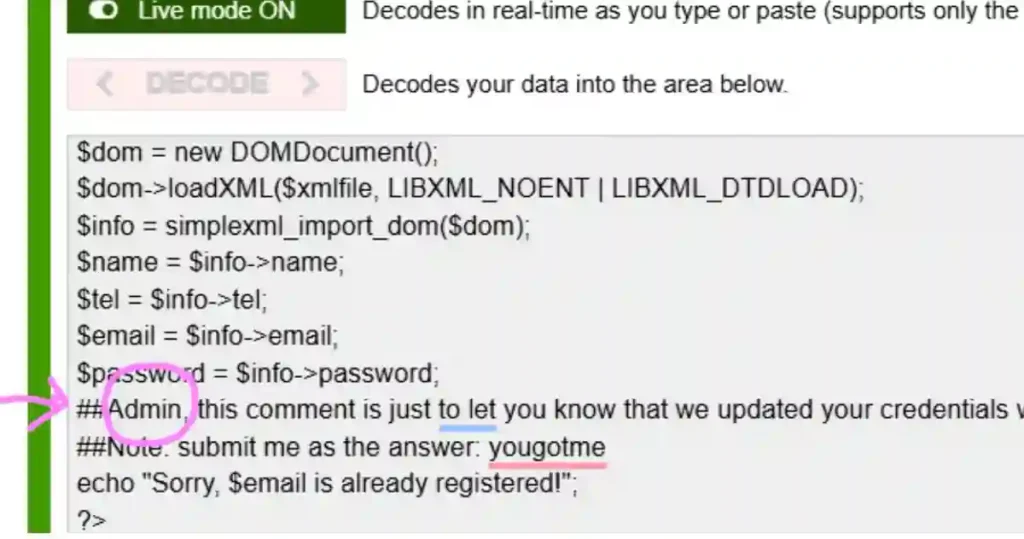
To determine the username the attacker found for the malicious network traffic analysis.
After exploiting the XML External Entity (XXE) vulnerability, I looked at the server’s responses and files to find a possible username.
I followed the HTTP streams using Wireshark and checked the server’s replies.
I found a note in the source code that said, “Admin comment: Let you know that we updated your CRS with a very secure password.”
This note pointed to the username admin, often used as a default for administrators. Based on what I found, the username the attacker discovered is admin.
6. The attacker tried to brute force the password of the possible username he found. What Is The Password Of That User?
To know the password of the possible user name he found for the malicious network traffic analysis, we are going to determine which password is valid for the user “admin,”
I used a filter to narrow the search in Wireshark. The filter I applied was:
http and ip.addr == 197.32.212.121 and http.response.code == 302

With this filter, I could see all the status codes marked as 302. This means the resource or webpage the client was trying to access is temporarily moved to a different location.
The client is told to follow the redirection to the new URL to find the resource.
Analyzing the second packet’s HTTP stream in the filtered results, I noticed that the brute force attempt succeeded.
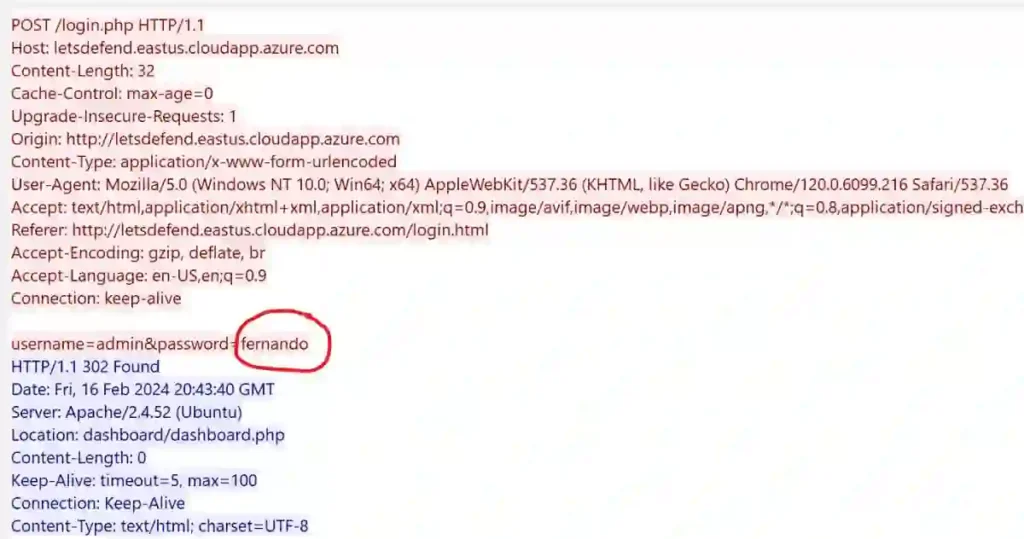
The password {fernando} was used, and it worked.
Here’s how I knew the login was successful: the HTTP request showed a POST method submitting login details, which is typical for login forms.
7. The attacker gained admin access; they explored another vulnerability that led the attacker to read internal files located on the server. What Payload Did The Attacker Use?
To find the details of the attack for the malicious network traffic analysis, I opened the capture file in Wireshark and applied a filter to focus only on HTTP requests.
I looked specifically at GET requests sent from the attacker’s IP address.
I checked the URL field for any unusual patterns, like ../ (used to move up directories) or %2F, which is a special code for /. But I didn’t find anything suspicious there.
Understanding this, I thought about the type of attack and looked for other clues.
I considered whether the attacker used an XXE (XML External Entity) vulnerability, which can trick a system into exposing private data.
To dig deeper, I applied a new and more precise filter in Wireshark.
http.request.method == GET and ip.addr == 197.32.212.121

This filter allowed me to capture all GET requests sent by the attacker’s IP to extract information from the web server.
The frame shows a strange request that is encoded (%2F..%2F..%2F..%2F..%2Fetc%2F).
This looks suspicious.
To figure out what the attacker sent, we will decode the strange-looking payload we noticed.
By using a tool called CyberChef to decode it, we uncovered the actual payload sent by the attacker.
../../../../../../../../../../../../../../../etc/passwd
This payload was designed to exploit a directory traversal vulnerability and access sensitive files.
Further inspection of the server’s response showed an HTTP 200 OK status, confirming that the exploit successfully retrieved the contents of the /etc/passwd file.
I pinpointed the attacker’s payload and validated its effectiveness by systematically analyzing the traffic and verifying the server’s response.
I noticed data extraction in the packet header, but the information must be decoded to reveal the correct path.
To achieve this, I used (https://www.url-encode-decode.com/) to decode the request. I could uncover the original path and analyze the malicious activity using appropriate decoding techniques.
8. The attacker could view all the users on the server. What is the last user that was created on the server?
To find the last user created by the attacker on the server for the malicious network traffic analysis, let applied the filter we used earlier in 7 above in Wireshark to focus on HTTP traffic using the filter:
http.request.method == GET and ip.addr == 197.32.212.121
This filter helped me find packets where the attacker might have requested or received important files.
If the attacker used a different protocol, like FTP or SMB, I adjusted the filter to include those as well, using ftp or smb2.
Using the suspicious file pattern (%2F..%2F..%2F..%2F..%2Fetc%2F) we found earlier.
I right-clicked the relevant packet and selected Follow > HTTP Stream (or TCP Stream for other protocols).
This showed all the content exchanged between the attacker and the server, including the /etc/passwd file, which stores information about users on the server.
I copied the contents of the file into a text editor for further analysis.
Each line in the file followed a specific pattern:
username:password:UID:GID:GECOS:home_directory:shell.
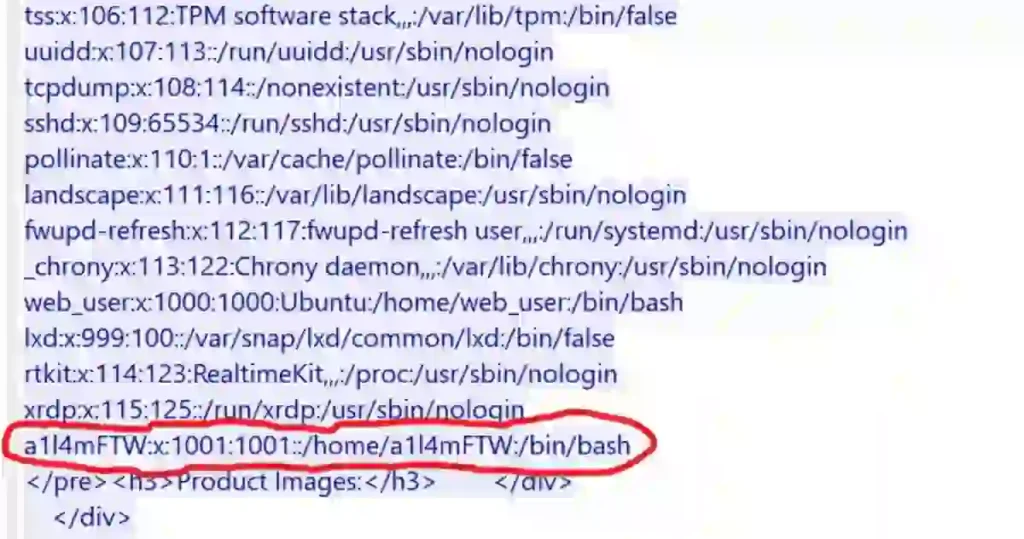
By scrolling through the file, I looked for the UID (User Identity) with the highest UID: a1l4mFTW:x:1001:1001::/home/a1l4mFTW:/bin/bash
Comparing this entry with others, I saw that a1l4mFTW had a UID of 1001, which was higher than web_user‘s UID of 1000.
This clearly showed that a1l4mFTW was the last user created on the server.
By carefully filtering the network traffic and analyzing the file’s contents, I was able to identify the last user created by the attacker.
It was exciting to trace each step and see how details like the UID helped reveal the order of user creation!
I could identify the last user created by carefully filtering the packets and analyzing the file’s content.
It felt great to trace this step-by-step and see how the UID reveals the order of user creation!
9. The attacker also found an open redirect vulnerability. What is the URL the attacker tested the exploit with?
To find the URL the attacker tested the exploit with for the malicious network traffic analysis.
We can again use the evidence obtained by the previous filter (http.request.method == “GET” and http contains “redirect” and ip.src == 197.32.212.121);

We see all the “GET” requests where we see the suspicious “redirect” content
We checked the last packet returned by this filter.
{GET /dashboard/redirect.php?url=https%3A%2F%2Fevil.com%2F HTTP/1.1\r\n}.
We could identify the URL the attacker used to exploit this vulnerability.
When I decoded the URL https%3A%2F%2Fevil.com%2F using both CyberChef and ChatGPT.
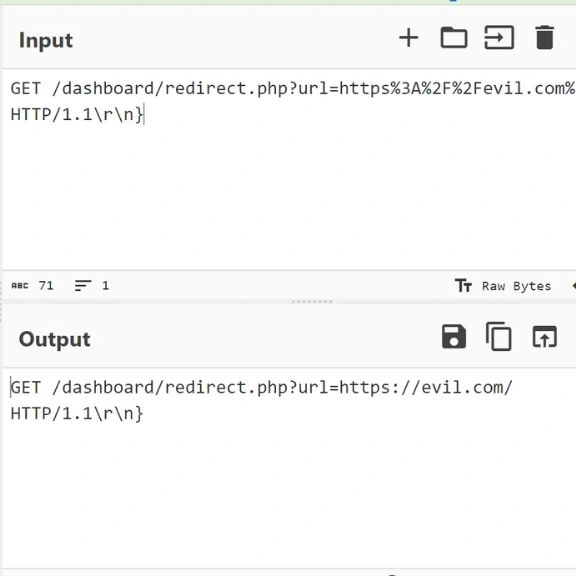
I used the prompt below in ChatGPT
“Please help to decode the following URL to the correct format: https%3A%2F%2Fevil.com%2F HTTP/1.1”.
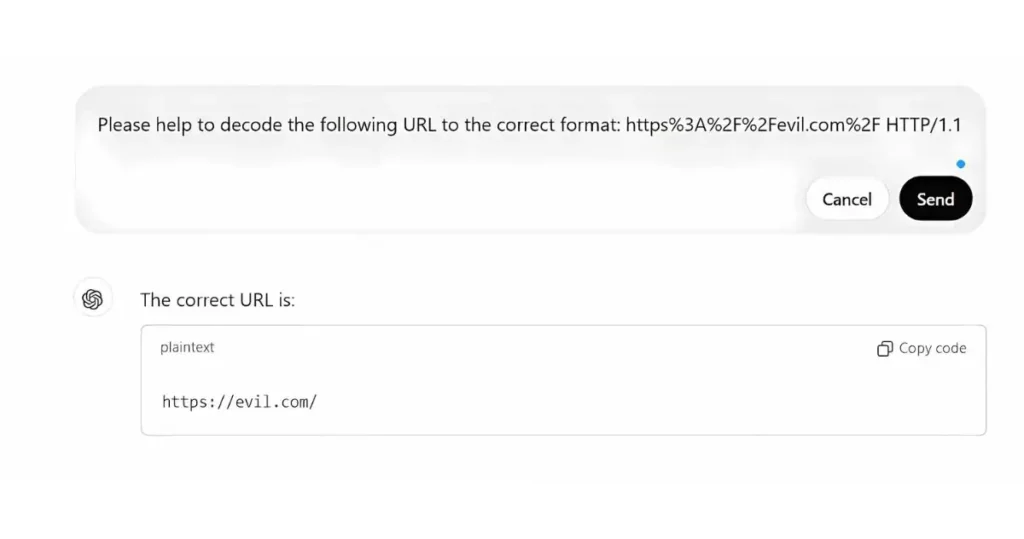
I found that it translates to https://evil.com/.
The encoding uses special characters, where %3A represents: and %2F represents /. After decoding, I confirmed that the full URL the attacker tested is:
All Answers for the Malicious Network Traffic Analysis
- What is the IP address of the web server? 10.1[.]0.4
- What is the IP address of the web server? 10.1[.]0.4
- What is the attacker’s IP address? 197.32.212[.]121
The attacker first tried to sign up on the website but found a vulnerability with which he could read the source code. What is the name of the vulnerability? XXE - There was a note in the source code; what is it? Yougotme
- After exploiting the previous vulnerability, the attacker got a hint about a possible username. What is the username that the attacker found? Admin
- The attacker tried to brute-force the password of the possible username that he found. What is the password of that user? Fernando
- Once the attacker gained admin access, they exploited another vulnerability that led the attacker to read internal files on the server. What payload did the attacker use? ../../../../../../../../../../../../../../../etc/passwd
- The attacker was able to view all the users on the server. What is the last user that was created on the server? a1l4mFTW
- The attacker also found an open redirect vulnerability. What is the URL the attacker tested the exploit with? https://evil.com/
FAQs for the Malicious Network Traffic Analysis
Which of the following tactics uses malicious code to redirect users’ web traffic?
The tactic that uses malicious code to redirect users’ web traffic is called DNS spoofing or DNS cache poisoning.
This attack involves corrupting the Domain Name System (DNS) cache with false information to redirect users from legitimate websites to malicious ones.
Which type of attack involves the installation of malicious code on personal computers or servers that redirects internet traffic from a legitimate website to an identical-looking but malicious imposter website?
This type of attack is known as a pharming attack.
Pharming involves the installation of malicious code, often through malware or DNS spoofing, which alters the way a computer or network resolves website addresses, leading users to a fraudulent site designed to steal sensitive information like login credentials or financial details.
What type of software will help protect your computer from malicious network traffic?
Firewall and Intrusion Detection Systems (IDS) are essential for safeguarding your computer. Firewalls block unauthorized access, while IDS monitors traffic for suspicious activity.
What action will an IDS take upon detection of malicious traffic?
An IDS typically alerts administrators to suspicious traffic and logs the details for further analysis.
Unlike an IPS (Intrusion Prevention System), an IDS does not block traffic automatically.
What tool can identify malicious traffic by comparing packet contents to known attack signatures?
A signature-based IDS tool, such as Snort, uses a database of known attack signatures to compare packet contents and flag malicious traffic.
What are the three types of malicious traffic detection methods?
- Signature-Based Detection: Identifies traffic patterns matching known attack signatures.
- Anomaly-Based Detection: Flags traffic that deviates from normal patterns.
- Hybrid Detection: Combines signature-based and anomaly-based methods for comprehensive monitoring.
These FAQs offer clear guidance on protecting your system and understanding critical detection tools and methods for malicious network traffic.
Conclusion
Malicious network traffic analysis helps protect your computer and network from cyber threats.
It allows you to find harmful activities, stop data theft, and keep your system safe.
You can use the tools shared here to check your network, find weaknesses, and fix them early.
A colleague once applied these methods and successfully stopped a breach before it caused harm.
Start today to stay safe from cyber threats and keep your system strong and secure.
Check out: “SOC Fundamentals: Mastering Tools, Roles, and Practices“ and unlock your full cybersecurity potential!
